Logging in via SSH
Since there is one terminal with small size in the VM, it is not very convenient to use. Therefore, we recommend you to log in the VM via SSH.
Creating a Host-only Network
First, you should create a host-only network for the VM. Do the followings:
- Shut down the VM.
- In the VirtualBox Manager, click
Filein the menu bar, then selectPreferences.... This will invoke a window for preference configuration. - Select the
Networkcategory on the left. - Click a plus button on the right of the window. This will add a host-only network named "VirtualBox Host-Only Ethernet Adapter".
- Click the button labeled with "Edit host-only network". This will invoke a dialog.
- In the
Adaptertab, do the following settings:- IPv4 Address: 192.168.56.1
- IPv4 Network Mask: 255.255.255.0
- In the
DHCP Servertab, do the following settings: - Check
Enable Server- Server Address: 192.168.56.100
- Server Mask: 255.255.255.0
- Lower Address Bound: 192.168.56.101
- Upper Address Bound: 192.168.56.245
- In the
- Click
OKto go back to the VirtualBox Manager, choose the VM, then click theSettingsbutton in the tool bar. This will invoke a window for VM configuration. - Select the
Networkcategory on the left. - Select the
Adapter 2tab on the right. - Enable "Adapter 2", and modify the
Attached toattribute of Adapter 2 toHost-only Adapter. TheNameattribute should becomeVirtualBox Host-Only Ethernet Adapterby default.
Now launch the VM. Run
sudo ifconfig eth1
You should see some information about the network interface "eth1". If you receive an error message like
eth1: error fetching interface information: Device not found
This is probably that you did not configure the host-only network correctly. Check yourself.
However, you can not see the IP address of eth1, this is because eth1 is still down. Again, you should modify the configuration file. Append the following lines at the end of the file /etc/network/interfaces:
auto eth1
iface eth1 inet dhcp
After modifying the "interfaces" file, restart the network:
sudo /etc/init.d/networking restart
Run
sudo ifconfig eth1
again. You should see the IP address of eth1, such as 192.168.56.xxx. Remember this IP address, and you will use it later.
Host Configuration
Now keep the VM on and go back to the host. You should perform some configurations to access the VM via SSH. According to the type of your host operating system, you will perform different configuration.
For GNU/Linux and Mac users
You will use the build-in ssh tool, and do not need to install an extra one. Open a terminal, run
ssh username@ip_addr
where username is your VM user name, ip_addr is the IP address of eth1 mentioned above. For example:
ssh ics@192.168.56.101
If you are prompted with
Are you sure you want to continue connecting (yes/no)?
enter "yes". Then enter your VM user password. If everything is fine, you will access the VM via SSH successfully. To exit SSH, just type
exit
in terminal.
For Windows users
Windows has no build-in ssh tool, and you have to download one manually. Download the latest release version of putty.exe here. Run putty.exe, and you will see a dialog is invoked. In the input box labeled with Host Name (or IP address), enter the IP address of eth1 mentioned above. Leave other settings default, then click Open button. Enter your VM user name and password. If everything is fine, you will access the VM via SSH successfully. To exit SSH, just type
exit
in terminal.
Installing tmux
tmux is a terminal multiplexer. With it, you can create multiple terminals in a single screen. It is very convenient when you are working with a high resolution monitor (that is why we recommend you to log in via SSH). To install tmux, just issue the following command:
apt-get install tmux
Now you can run tmux, but let's do some configuration first. Go back to the home directory:
cd ~
New a file called .tmux.conf:
vim .tmux.conf
Append the following content to the file:
setw -g c0-change-trigger 100
setw -g c0-change-interval 250

bind-key c new-window -c "#{pane_current_path}"
bind-key % split-window -h -c "#{pane_current_path}"
bind-key '"' split-window -c "#{pane_current_path}"
The first two lines of settings control the output rate of tmux. Without them, tmux may become unresponsive when lots of contents are output to the screen. The last three lines of settings make tmux "remember" the current working directory of the current pane while creating new window/pane.
If you use ls to list files, you will not see the .tmux.conf you just created. This is because a file whose name starts with a . is a hidden file in GNU/Linux. To show hidden files, use ls with -a option:
ls -a
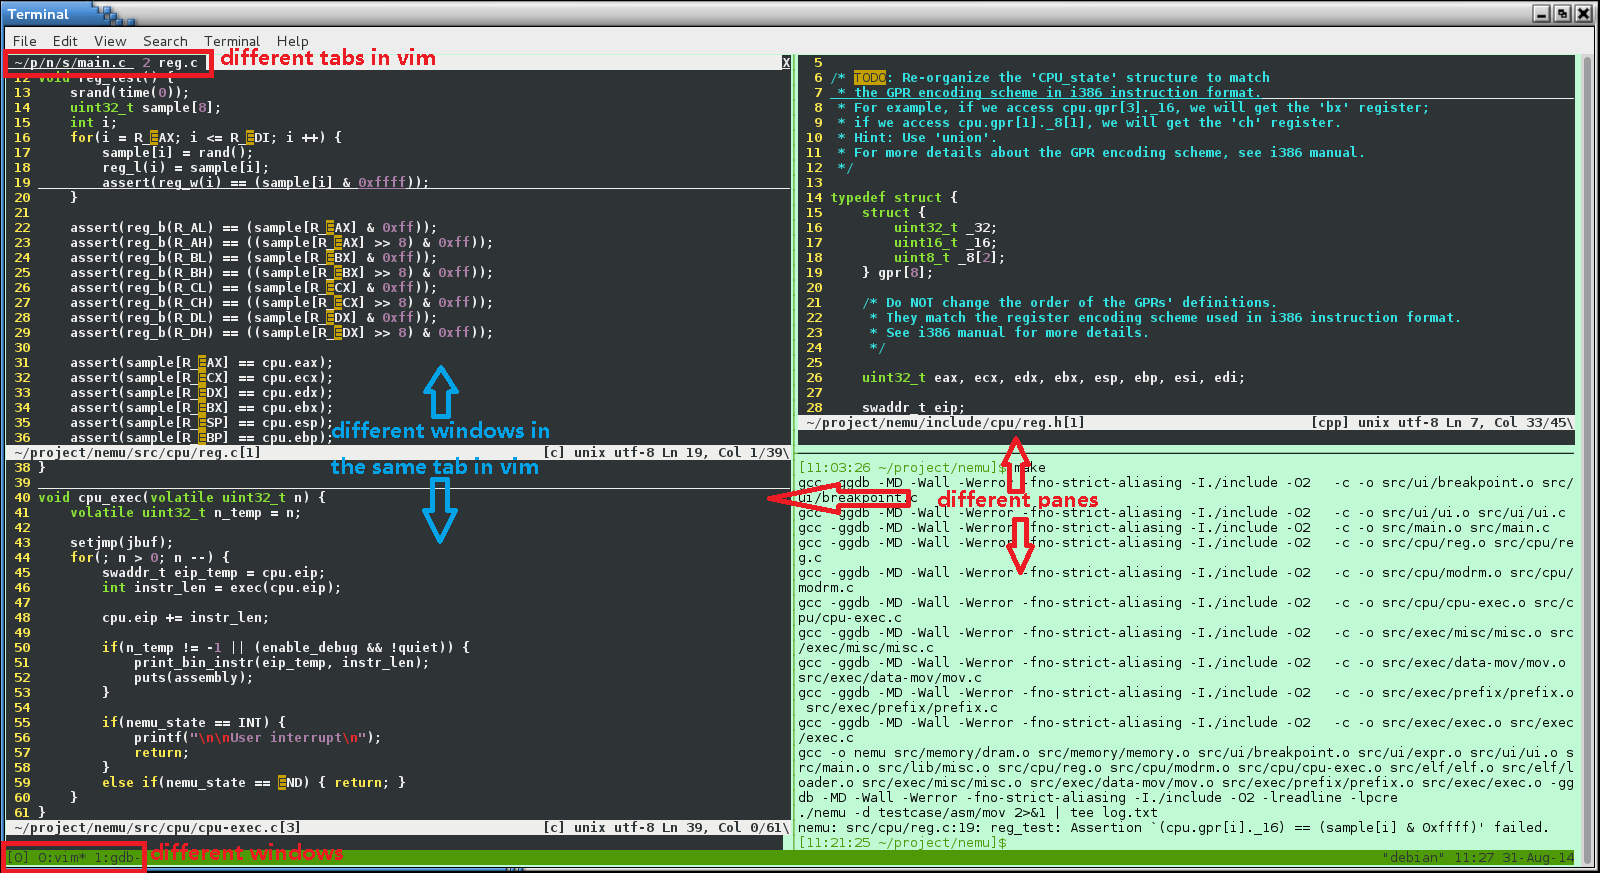
You can scroll the content in a tmux terminal up and down. Also, using tmux with SSH, you can create multiple normal-size terminals within single screen. For how to use tmux, please search the Internet. The following picture shows a scene working with multiple terminals within single screen. Is it COOL?
You should have used scroll bars in GUI. You may take this for granted. So you may consider the original un-scrollable terminal in the VM (the one you use when you just log in) the hell. But think of these: why the original terminal can not be scrolled? How does tmux make the terminals scrollable? And last, do you know how to implement a scroll bar?
GUI is not something mysterious. Remember, behind every elements in GUI, there is a story about it. Learn the story, and you will learn a lot. You may say "I just use GUI, and it is unnecessary to learn the story." Yes, you are right. The appearance of GUI is to hide the story for users. But almost everyone uses GUI in the world, and that is why you can not tell the difference between you and them.